Add a Game Pass Purchase Button in Roblox
Show a Pass name and current price in an in-game card, open Roblox’s purchase prompt, and apply owned UI through a server test.
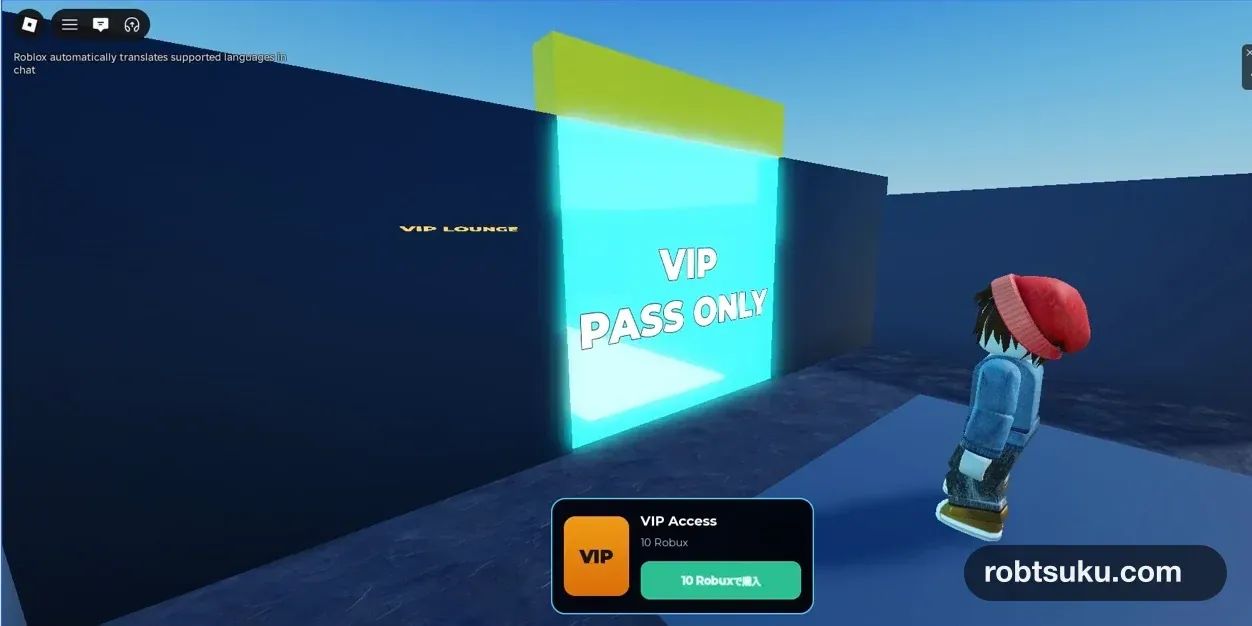
Add a VIP Pass card to the bottom of the game screen. It will load the Pass name and the current price from Roblox, then let an unowned player open the standard purchase prompt.
The finished purchase card looks like this before the prompt opens:
Figure guide: The shared screenshot uses Japanese button text. The English code displays the Pass name,
10 Robux, and a green Buy for 10 Robux button in the same three positions.
Allow about 10 minutes. Start from Create a VIP Door with a Game Pass. ServerScriptService > VipAccess must already create the server-owned player.HasVipPass BoolValue and provide setVipAccess(player, hasVipPass).
This guide does not complete a real purchase. You will inspect the prompt, close any screen that is not explicitly marked as a no-charge Studio test, and use a server-only Studio event to exercise the same success handler. That state lasts only until Stop and creates no Pass ownership, sales record, or Robux transfer. Roblox’s Mock Purchases announcement describes the same non-persistent Studio boundary.
Important: Confirm the no-charge message before accepting any prompt
Continue only if the prompt clearly says that it is a test or mock purchase and that no Robux will be charged. Otherwise, close it. The server-only test later in this guide reaches the required gameplay result without a transaction.
1. Put the Pass on sale
Open the game in Creator Dashboard and go to Monetization > Passes. Select the Pass from the previous guide, open Sales, enable Item for Sale, set Price in Robux to 10, and click Save Changes.
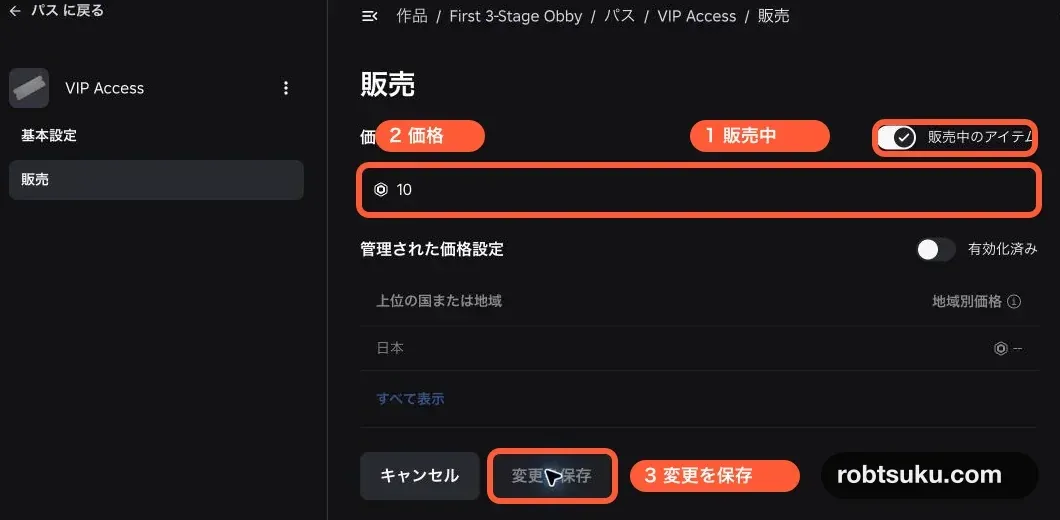
Figure guide: Marker 1 identifies Item for Sale, marker 2 surrounds Price in Robux, and marker 3 points to Save Changes.
Changing the sale setting costs no Robux. A real player who later accepts a production prompt will spend the price shown in that prompt; this guide never accepts that transaction.
Tip: Do not hard-code 10 in the in-game card
Regional pricing or another eligible discount can change the price shown to a particular player. The next Script asks Roblox for that player’s current value instead of copying the Dashboard base price.
2. Build the VIP Pass card
Add a ScreenGui to StarterGui and rename it VipPassGui. Inside it, add a Frame named VipPassCard, then create these four children:
VipPassGui
└─ VipPassCard
   ├─ PassName       (TextLabel)
   ├─ PriceLabel     (TextLabel)
   ├─ PurchaseButton (TextButton)
   └─ PassStore      (LocalScript)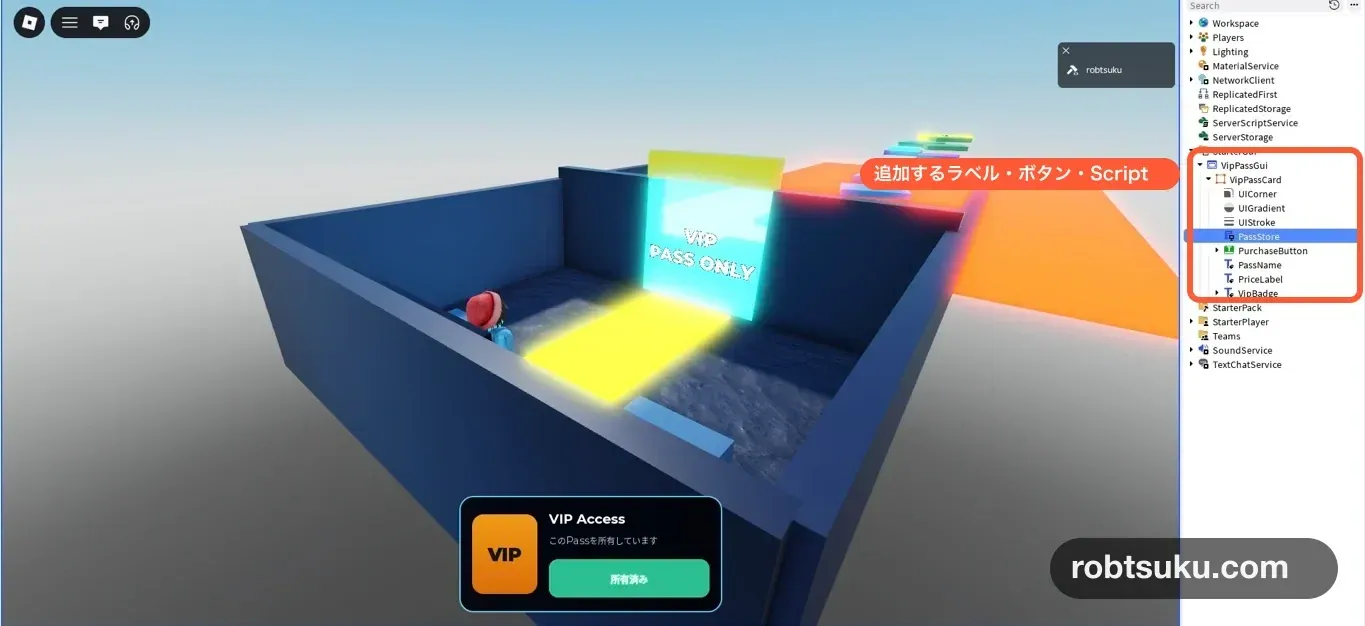
Place VipPassCard near the bottom center of the screen. A size around 360 by 180 gives the three text rows enough room. Set these temporary values:
PassName.Text:VIP PassPriceLabel.Text:Checking price...PurchaseButton.Text:Loading...
Turn VipPassGui.ResetOnSpawn off so the card stays available after a character respawns. Keep the labels and button readable against the Frame background.
The button uses Activated, which works with mouse, touch, and gamepad input. Roblox recommends this event in its button scripting guide.
Tip: A LocalScript controls one player’s screen
PassStoreloads that player’s price and opens that player’s prompt. It readsHasVipPassfor display, but it never grants VIP access. Only the server Script changes the privilege.
3. Load the Pass name and current price
Open PassStore, delete its starter code, and paste the following. Replace only the 0 in PASS_ID = 0 with the same Pass ID used by VipAccess.
local MarketplaceService = game:GetService("MarketplaceService")
local Players = game:GetService("Players")

local PASS_ID = 0 -- Replace with the Pass ID you created

local player = Players.LocalPlayer
local hasVipPass = player:WaitForChild("HasVipPass")
local card = script.Parent
local passName = card:WaitForChild("PassName")
local priceLabel = card:WaitForChild("PriceLabel")
local purchaseButton = card:WaitForChild("PurchaseButton")

local productReady = false
local canRetry = false
local promptOpen = false
local currentPrice = 0

local function updateDisplay()
	if hasVipPass.Value then
		priceLabel.Text = "You own this Pass"
		purchaseButton.Text = "Owned"
		purchaseButton.Active = false
		purchaseButton.AutoButtonColor = false
		return
	end

	purchaseButton.AutoButtonColor = true
	if productReady then
		priceLabel.Text = tostring(currentPrice) .. " Robux"
		purchaseButton.Text = "Buy for " .. tostring(currentPrice) .. " Robux"
		purchaseButton.Active = not promptOpen
	else
		purchaseButton.Active = canRetry
	end
end

local function loadProduct()
	productReady = false
	canRetry = false
	priceLabel.Text = "Checking price..."
	purchaseButton.Text = "Loading..."
	purchaseButton.Active = false
	updateDisplay()

	local success, productInfo = pcall(function()
		return MarketplaceService:GetProductInfoAsync(
			PASS_ID,
			Enum.InfoType.GamePass
		)
	end)

	if not success then
		warn("Pass information failed:", productInfo)
		priceLabel.Text = "Price unavailable"
		purchaseButton.Text = "Reload price"
		canRetry = true
		updateDisplay()
		return
	end

	passName.Text = productInfo.Name
	if productInfo.IsForSale and typeof(productInfo.PriceInRobux) == "number" then
		currentPrice = productInfo.PriceInRobux
		productReady = true
	else
		priceLabel.Text = "Not currently for sale"
		purchaseButton.Text = "Unavailable"
	end
	updateDisplay()
end

purchaseButton.Activated:Connect(function()
	if hasVipPass.Value or promptOpen then
		return
	end
	if not productReady then
		if canRetry then
			loadProduct()
		end
		return
	end

	promptOpen = true
	updateDisplay()
	MarketplaceService:PromptGamePassPurchase(player, PASS_ID)
end)

MarketplaceService.PromptGamePassPurchaseFinished:Connect(
	function(finishedPlayer, purchasedPassId, wasPurchased)
		if finishedPlayer ~= player or purchasedPassId ~= PASS_ID then
			return
		end

		promptOpen = false
		if wasPurchased and not hasVipPass.Value then
			purchaseButton.Text = "Applying ownership..."
			purchaseButton.Active = false
			purchaseButton.AutoButtonColor = false
			return
		end
		updateDisplay()
	end
)

hasVipPass.Changed:Connect(updateDisplay)
updateDisplay()
loadProduct()
Roblox’s regional pricing guidance says to display a player’s current Pass price from product information. GetProductInfoAsync() returns Name, IsForSale, and PriceInRobux; the code renders those values instead of a fixed 10.
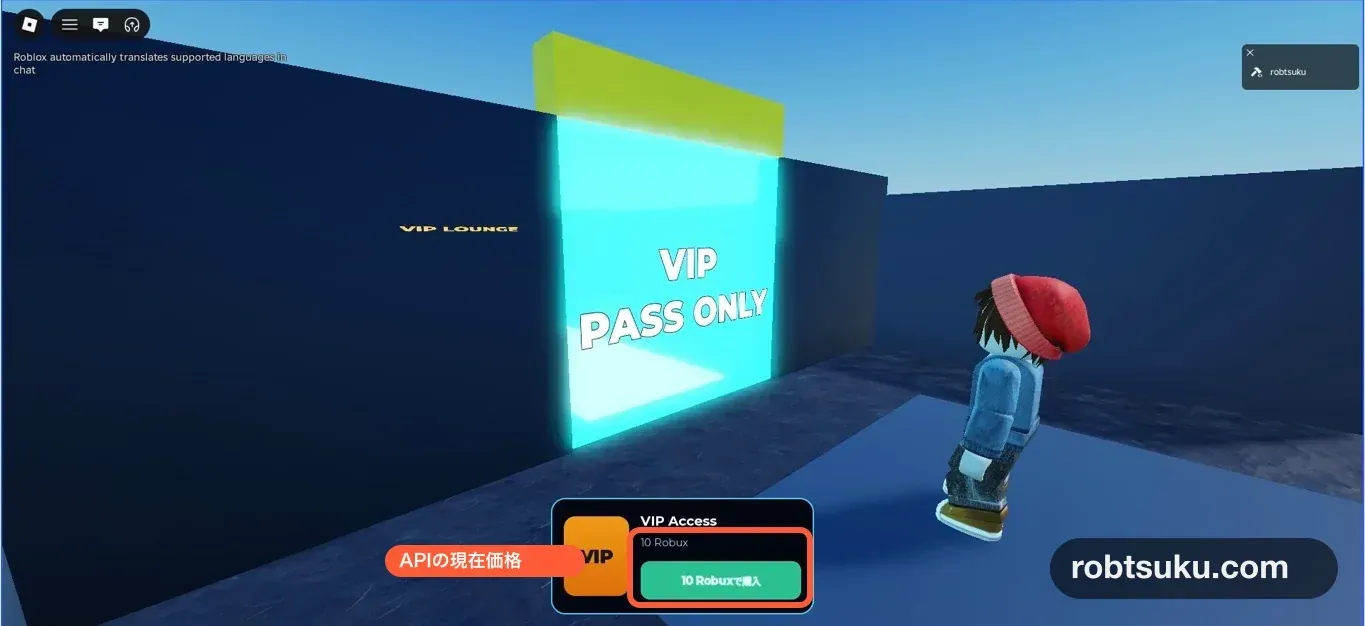
productReady becomes true only after the API returns an on-sale Pass and a numeric price. promptOpen prevents repeated prompts while one is open. If the product request fails, canRetry changes the same button to Reload price.
The Dashboard base price and displayed price can differ. Regional pricing and eligible Roblox Plus discounts may affect the player’s current value. Keep PriceInRobux as the display source.
4. Handle the completed prompt on the server
Do not set HasVipPass from PassStore. Open ServerScriptService > VipAccess and add this service beside its other GetService() lines:
local ServerStorage = game:GetService("ServerStorage")Then add this block below the existing setVipAccess() function. Use the same PASS_ID already present in VipAccess.
local function onPromptGamePassPurchaseFinished(
	player,
	purchasedPassId,
	wasPurchased
)
	if not wasPurchased or purchasedPassId ~= PASS_ID then
		return
	end

	setVipAccess(player, true)
end

MarketplaceService.PromptGamePassPurchaseFinished:Connect(
	onPromptGamePassPurchaseFinished
)

if RunService:IsStudio() then
	local studioMockPurchase = Instance.new("BindableEvent")
	studioMockPurchase.Name = "StudioMockVipPurchase"
	studioMockPurchase.Parent = ServerStorage

	studioMockPurchase.Event:Connect(function(player)
		onPromptGamePassPurchaseFinished(player, PASS_ID, true)
	end)
end
The production path follows Roblox’s in-experience Pass example: the server receives PromptGamePassPurchaseFinished, verifies success and the exact ID, then applies the current-session privilege.
StudioMockVipPurchase is a BindableEvent created only in Studio and stored in ServerStorage. A client cannot fire it, and it does not exist on a production server. Its test call enters the same named handler as the production event, without a purchase.
5. Inspect the prompt and test the owned state
Leave STUDIO_TEST_OWNED = false in VipAccess and press Play. The card should load the Pass name, current price, and Buy for … Robux.
Press the purchase button once and confirm that Roblox’s prompt opens. If the account already owns the Pass, Studio displays a message saying the item is already owned and the account was not charged. The shared screenshot shows that branch.
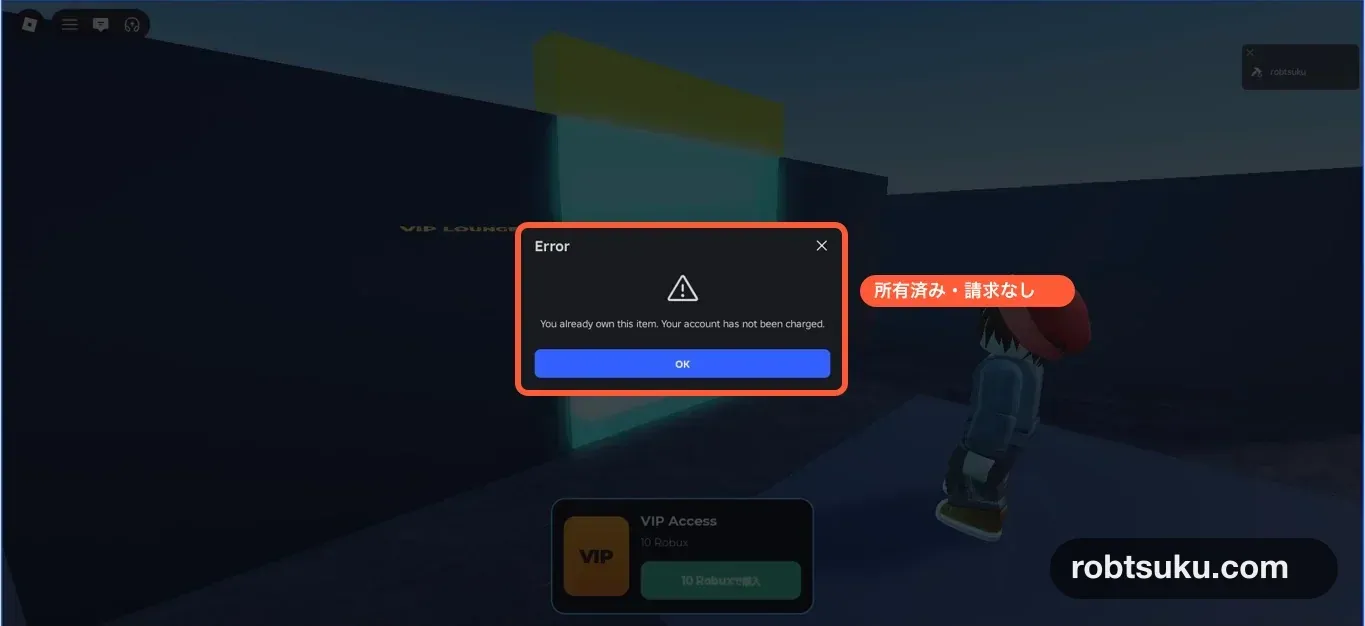
Close this screen. An already-owned prompt does not test the unowned purchase-success branch, and HasVipPass should remain false under the tutorial’s Studio override.
If an unowned account sees an explicit Studio mock/no-charge message, that mock path may be used. If either condition is missing, close the prompt and continue with the deterministic server test below.
Fire the Studio-only server event
While Play is running, open Window > Script > Command Bar. Switch the test window to Server view; its frame is green. Paste this line into Command Bar and run it:
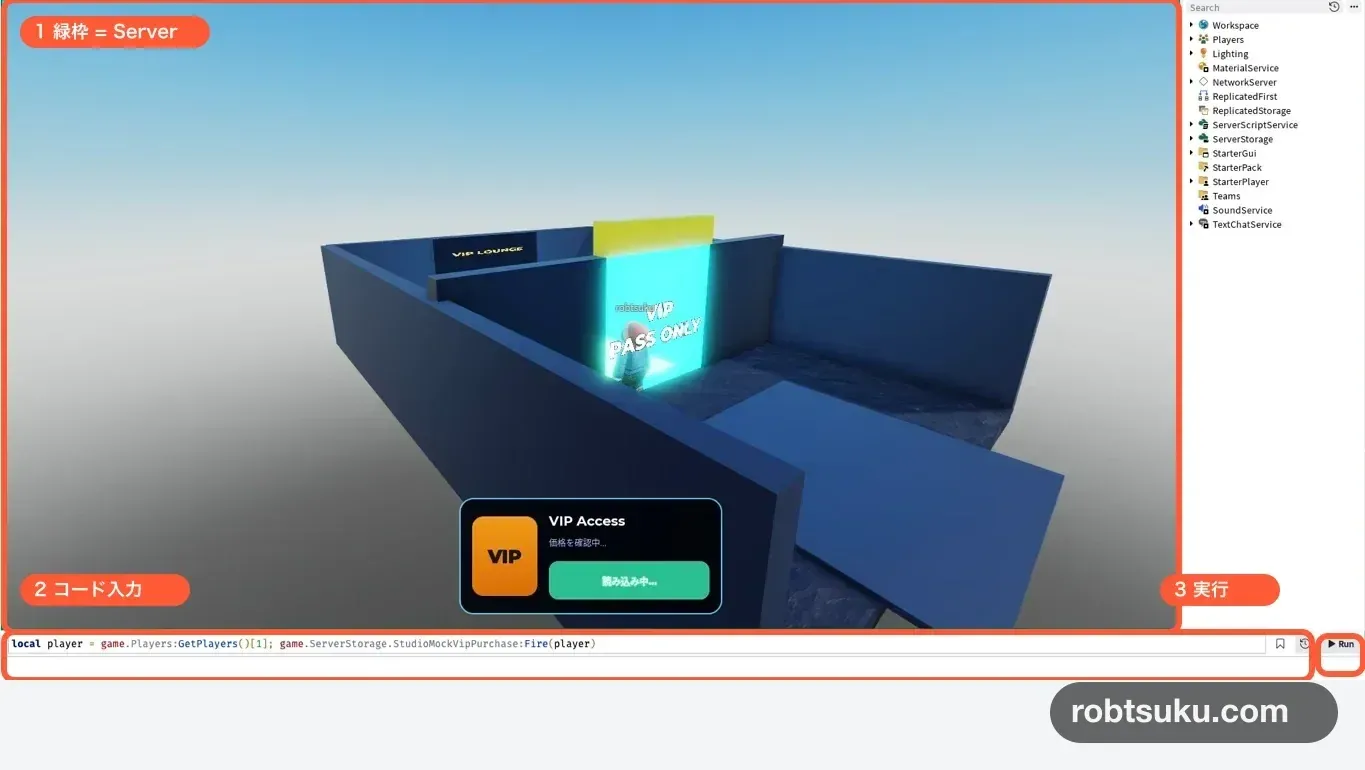
Figure guide: Marker 1 identifies the green Server frame, marker 2 surrounds the Command Bar input, and marker 3 points to Run.
local player = game.Players:GetPlayers()[1]
game.ServerStorage.StudioMockVipPurchase:Fire(player)
Return to the client view. The card should change to You own this Pass and Owned, and the character should pass through the VIP door during the same Play. Clicking the inactive Owned button should not open another prompt.

Figure guide: The GIF begins with the Japanese version of Buy for 10 Robux. After the server event, the card changes to the Japanese versions of You own this Pass and Owned. The top banner says this Studio test applies only to the current session.
Press Stop, then start another Play. The test event and owned state do not persist, so the current-price purchase card returns.
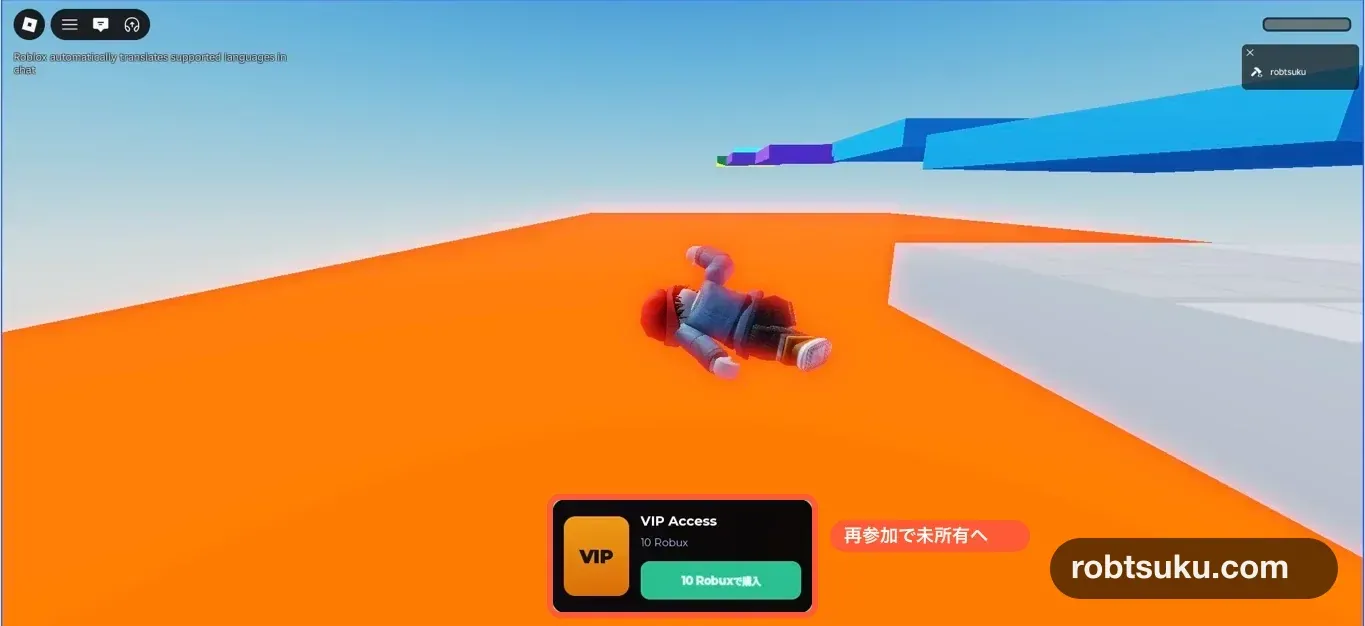
Figure guide: The orange note marks that a new Play has returned to the unowned purchase state. The English code shows Buy for 10 Robux in the green button.
Production ownership remains separate: when a real server starts, the previous guide’s UserOwnsGamePassAsync() check decides whether the joining player owns the Pass.
If the card or test does not work
- Stuck on Checking price: Confirm
PassStoreis a LocalScript. - Price unavailable: Replace
PASS_ID = 0, inspect Output, then click Reload price. - Not currently for sale: Recheck Monetization > Passes > Sales > Item for Sale.
- Price differs from Dashboard: Keep the API value; regional pricing or an eligible discount may apply.
- The server test does not open the door: Run the command in green Server view and confirm both Scripts use the same Pass ID.
- StudioMockVipPurchase is missing: The event exists only during Play on the server.
- A new Play returns to the purchase state: That is the expected Studio boundary, not a failed test.
- The prompt has no test/no-charge label: Close it and use the server event. Do not enter payment details.
Completion check
- The card displays the API-returned name and current price.
- The button opens Roblox’s purchase prompt.
- Closing an uncompleted or already-owned prompt grants no access.
- The server-only Studio event changes the current Play to Owned and opens the VIP door.
- The Owned button cannot open another prompt.
- A new Play resets the Studio test state.
- No Robux was spent and no persistent ownership was created.
The project now displays the current Pass price and can apply owned access safely for the current Studio Play. The next monetization guide uses a repeatable Developer Product and grants coins through its server receipt handler.
Official sources
Sell Coins with a Roblox Developer Product
Create a repeatable 100-coin product, grant and save it through ProcessReceipt, and prevent one PurchaseId from awarding coins twice.
Build this feature
Create a Roblox VIP Door with a Game Pass
Check Game Pass ownership on the server and use collision groups so guests stop at a VIP door while members can walk through.
Build this feature